
User Tools
This is an old revision of the document!
Table of Contents
Cost Centers
To capture effort across a process and also improve accountability and transparency, you can use cost centers. Thus, each employee can e.g. capture the time he spent on a task. A user who can access the instance can look at it to check how long it takes employees for a task or the cost of the process instance.
Create a Cost Center
This example is about a simple consulting process with 3 tasks spread over two Group:
- A consultant should make an appointment
- A caterer should finish the room for the appointment (provide snacks etc.)
- The consultant does the consulting engagement
To create a Cost Center, a user must have Administrator Role in the "Administration"-Client to log in and click on the tab “Cost Centers”
Click on the green “+” icon to open a pop-up, where you can create a cost center.
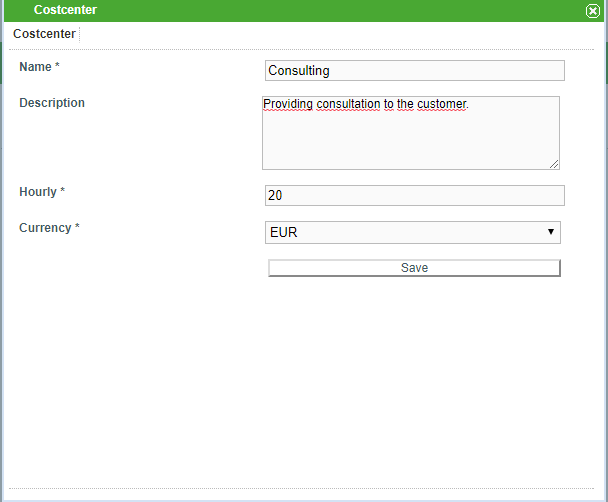
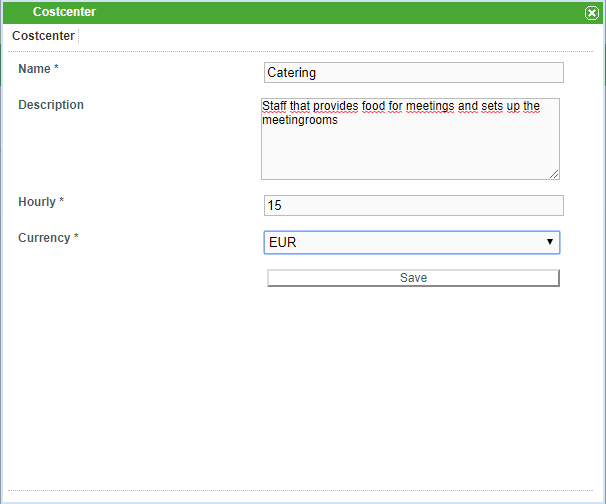
Name:
Here a specific name should be defined, which describes the cost center.
Description:
Optionally, a description of the cost center can be stored here.
Hourly:
Here the hourly rate of the respective cost center employee is entered.
Currency:
Here the currency of the hourly rate is entered.
Enter Expenses
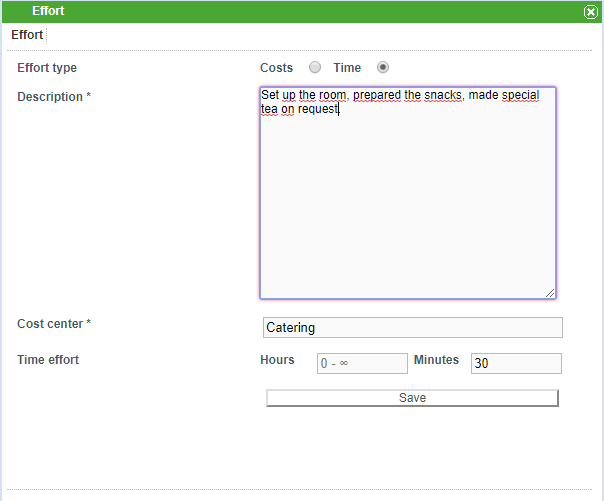
At each instance of this process, each employee can now save their expenses, whether their own time or just costs (such as expenses or purchases).
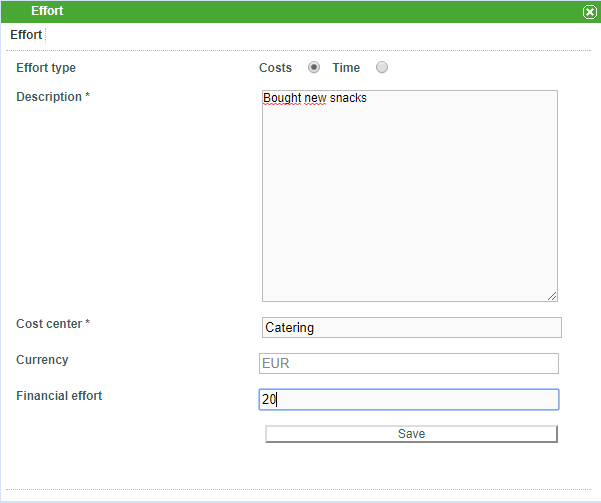
In this example, the caterer Benjamin Beaufort spent 30 minutes preparing and making tea and snacks worth 20 euros to buy the room and snacks. To enter this he must right-click on the assigned Task and select “Expenses”. First, he enters his time spent, selecting “time” as the type, entering a description of his activity, entering his cost center (the entry is supported with an autocomplete) and the time he spent:
He then notes the expenses for the snacks. As a type, he now selects “costs”, also deposits a description here, as well as his cost center and the output:
An executive who wants to see how much effort has gone into fulfilling a Task can right-click and select “Expenditure”. He is then shown a list of all expenses for this specific Aufgabe:

In the case of the Tasks assigned to the consultant, the latter also deposits his time.
Auswertung der gesammten Kosten über die Instanzdauer
If someone is interested in the entire effort that has be allocated to an instance, you can display it.
To do this, he right-clicks the instance that interests him and selects “Expenditure”. Then he gets a summary of the costs incurred in this instance:
 This summary includes:
- Every single effort
- A sum of all direct expenses
- A sum of all material expenses
- A sum of all working hours * hourly costs
- The total cost of this instance
In this example, you can read the following things:
The cost center Catering has both a 20 Euro direct in the Task “make room ready”, and 30 minutes were spent on it. Both were registered by the employee “Benjamin Beaufort”.
The cost center Consulting has deposited both 60 minutes in the Task “make appointment”, 240 minutes in the Task “carryout Consulting”.
The total direct expenses of this instance amount to 20 €.
The total time required for this instance is 330 minutes.
The total time at the respective hourly rate of this instance amounts to 107,50 €.
In total, this instance has the total cost of 127.50 €.
Standard Kostenstellen
Mitarbeiter sind öfters hauptsächlich einer Kostenstelle zugeordnet, deshalb kann Usern eine Standard-Kostenstelle zugeordnet werden.
In diesem Beispiel würde es z.B. Sinn machen, einen Consultant der Standard-Kostenstelle “Consulting” zuzuordnen.
Dazu muss im Userprofil das Feld für Kostenstelle befüllt werden (hierbei werden per Autocomplete Kostenstellen vorgeschlagen). Anschließend wird beim hinterlegen von Aufwänden das Feld für Kostenstelle automatisch vorbefüllt, ist aber änderbar. So kann es natürlich vorkommen, dass z.B. ein Consultant einmal Snacks kauft und diese als Kosten hinterlegen will. Zwar wird die Kostenstelle in seinem Fall mit “Consulting” vorbefüllt, kann aber von ihm problemlos auf “Catering” geändert werden.
Unter- sowie Obergrenze für Kosten
Mithilfe der tim.properties Datei kann man Ober- sowie Untergrenzen für hinterlegete Aufwände festlegen. So kann man z.B. einstellen, dass nur Aufwände von mindestens 15 Minuten hinterlegt werden und/oder nich länger als 8 Stunden sein dürfen.
Kostenstellen Import über LDAP
Kostenstellen können auch von LDAP importiert werden.
Verpflichtende Aufwände
Über den"Process-Repository"-Client kann man User dazu verpflichten, bei Abschluss von Aufgaben mindestens entweder nur monetäre Aufwändungen oder nur zeitliche Aufwändungen oder eines der beiden zu hinterlegen.
